Rule overview
A Rule is an event-triggered Smart Campaign. It listens for a member event (purchase, coupon entry, tag change, survey…), checks conditions, and runs actions (send SMS, add credits, grant a gift, change a tag…). Rules are the workhorse of Smart Campaigns — most programs you'll build are Rules.
For the detailed reference on what you can trigger on, filter by, and do inside a Rule, see the Campaign essentials pages.
What makes something a Rule
Three properties define a Rule and separate it from the other four campaign kinds:
- Event-triggered. A Rule starts when something happens — a purchase, a coupon entry, a tag change, a survey submission. If what starts the campaign is a date or schedule instead, that's a Future Campaign or a Scheduled campaign. If what you want is a silent discount applied at the register on every matching check, that's a Deal (for identified members) or a POS Deal (for any shopper).
- Uses the 9-action set. Rules can send messages, grant loyalty balances or assets, and change membership tags — see the Actions catalog. Rules cannot apply a register-side price discount; that's what Deals and POS Deals are for.
- Runs automatically. The member doesn't see a Rule in any "campaign picker" and doesn't opt into it. The Rule watches for its trigger silently and fires when the conditions are met.
When to reach for a Rule
Pick a Rule when the answer to "what starts it?" is an event, and the answer to "what do I want to happen?" is something behind the scenes — a message, a credit or point grant, a tag change, a gift or punch-card issuance.
Some common shapes:
- "Every time a member makes a purchase, give them 10 % credits back and thank them by SMS." → Rule on Makes a purchase, two stacked actions. See the Credits back + SMS playbook.
- "Give members a free coffee on their 10th visit." → Rule on a punch-card flow. See the Punch card playbook.
- "When a member crosses $1,000 lifetime spend, tag them VIP." → Rule on Total spend updated with a member-level threshold in a case.
- "When a member's email-domain verification completes, tag them with the company name so company-tier perks unlock." → Rule on Verification+ applied.
If your answer to "what starts it?" isn't an event — or you want a price discount at the register — see Smart Campaigns overview → Picking the right kind instead. Date-driven sends like "send an SMS on the member's birthday" are not Rules — they're Scheduled campaigns; see the Birthday gift playbook for the worked pattern.
Anatomy of a Rule
Every Rule has the same three-part structure, established on step 2 and step 3 of the wizard:
- A trigger — picked from the Triggers reference. One trigger per Rule.
- Zero or more conditions — narrow which instances of the trigger should fire the Rule. See the Conditions reference.
- One or more actions — what the Rule does. See the Actions catalog. Actions can be stacked (all run together), or split into mutually-exclusive branches via cases.
Those three pieces — plus the trigger-agnostic audience / timing / rate cap tiles on step 2 — are all a Rule is. Once you internalize the shape, building a new Rule is mostly mechanical.
The Rule wizard
The Rule wizard has four steps, the same as every other campaign kind. This section is a guided tour; each step has its own deep-dive reference elsewhere.
Step 1 — Campaign details
Name the Rule, pick its kind (Rule), optionally describe what it does, and set its initial state. The state choice matters — see Lifecycle below.
Use the description field to record why the Rule exists and any constraints that aren't obvious from the configuration — e.g. "Replaces the Q2 cashback promo that ran via external batch; don't delete before Q3". Six months from now, future-you will be grateful.
Step 2 — When
This is where you pick the trigger and narrow it. Four sections:
- Trigger — pick one of the 14 triggers at the top of the step.
- Audience tile — default To all registered members. Click the tile to narrow the Rule to a specific subset of members defined by their profile attributes — tags, balances, consent flags, birthday fields, visit count, registration source, preferred language, and more. The attribute picker shows what's currently available; you can stack several attribute filters in one audience definition.
- Timing tile — default At any date and time. Restricts when the Rule is allowed to fire (time-of-day window, date range, day-of-week).
- Rate cap tile — default Infinite times per member. Caps how many times a single member can trigger the Rule.
Below those tiles, the Conditions section shows trigger-specific filters. The field list varies by trigger — see the Triggers reference for what each trigger exposes.
Audience vs Conditions vs Cases — when to use which. The audience tile and case conditions can both filter on member attributes, so it's worth knowing where each belongs:
- Audience (step 2 tile) — a Rule-wide member filter. If the member doesn't match, the Rule doesn't fire at all. Use this for "this Rule only applies to VIPs" or "only members with SMS consent".
- Conditions (step 2, below the tiles) — filters on the triggering event (basket total, branch, coupon code, etc.). Narrow which instances of the trigger fire the Rule.
- Case conditions (step 3) — per-branch filters once the Rule has decided to fire. Use these to give different rewards to different member segments in the same Rule — e.g. 15 % to VIPs, 10 % to regulars, 5 % to everyone else.
Rule of thumb: if the filter decides whether the Rule runs at all, it's an audience or a condition. If it decides which branch runs, it's a case condition.
Step 3 — Actions
Pick one or more actions from the 9-action menu (Communication / Assets / Membership). Actions can be stacked — they all run together, in order — or split into cases, which branches the Rule's actions based on a per-case condition.
- For when to stack vs split, see Split into cases.
- For what each action does, see the Actions catalog.
Toggling Split into several cases after you've filled in actions wipes the previous configuration. Decide on stacked-vs-split before you start filling in details.
Step 4 — Preview
A read-only summary of the entire Rule — trigger, conditions, actions, delays, the lot. Use this as a last check before saving. The Save button commits the Rule; if the state on step 1 was Draft, it goes in as a draft instead of firing. Flip it to Active from the list view when you're ready.
Lifecycle
Three states — Active, Draft, Paused — and what happens to events during a pause
A Rule moves through three states, set on step 1 (and editable afterwards):
- Active — the Rule is live. Every time its trigger fires and its conditions pass, its actions run.
- Draft — the Rule is saved but does not fire. Use this while you're still configuring, or to hold a Rule in cold storage without deleting it.
- Paused — the Rule is active-in-principle but temporarily not firing. Use this for short-term pauses — a promotional blackout, a deliverability issue, a pending revision.
Events that happen while a Rule is Paused are lost — they don't queue up and fire when you resume. If a member made a qualifying purchase during the pause, that purchase won't retroactively earn them the Rule's reward. Plan pauses around this: if you're pausing for a few hours of maintenance, it's usually fine; if you're pausing for days over a holiday, members who transact in that window simply miss out.
Editing an Active Rule takes effect on the next firing — the change doesn't retroactively rewrite prior firings, but every event that arrives after you save runs against the new configuration.
Prefer Paused over delete for Rules you might want back. Paused preserves the full configuration (including the description field); a deleted Rule has to be rebuilt from memory.
Testing a Rule before going live
5-step pattern using a test-user tag and a real trigger event
The platform does not have a "fire once for this specific member" test mode built into the wizard — there's no sandbox that simulates a trigger event. The pattern that works in practice:
- Build the Rule with state Draft on step 1.
- Walk through step 4 — Preview — and verify the configured trigger, conditions, and actions match your intent.
- Narrow the Audience to a small known test segment — the simplest way is to tag yourself and a teammate with something like
test-userand target that tag on the Audience tile. - Flip the state to Active, trigger the event (make a purchase, enter a coupon, etc.), and verify the expected result on the test members.
- Broaden the Audience once you're satisfied, and re-save.
Because edits to an Active Rule apply to subsequent firings (not retroactively), it's safe to widen the Audience from test-user to the real target population in a single edit — the Rule won't suddenly fire against all the qualifying events that already happened during your test.
Monitoring a live SMS / Email Rule
Communication Analytics — delivery metrics for SMS / email Rules only
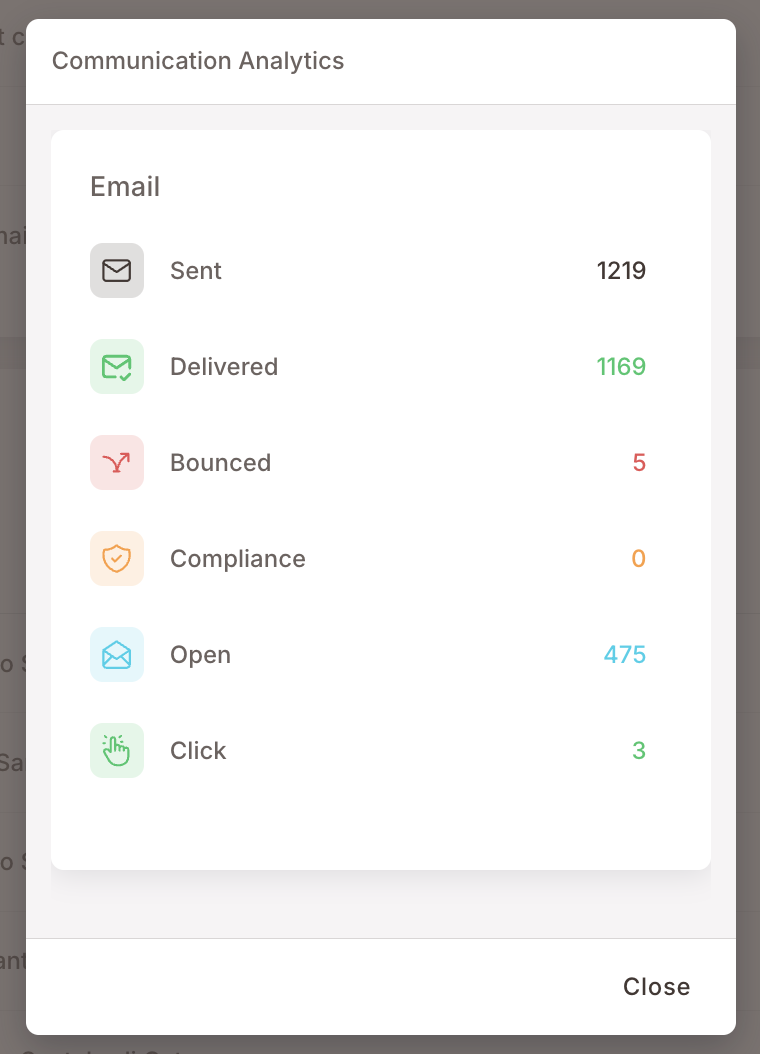
The platform exposes a Communication Analytics view for Rules that include a Send SMS or Send email action. It shows delivery-shaped metrics for the messages the Rule has sent:
- Sent — how many messages the Rule attempted to deliver.
- Delivered — how many reached the member's inbox or device.
- Bounced — how many failed delivery (bad address, blocked domain, etc.).
- Compliance — messages blocked for consent / regulatory reasons (e.g. member has since revoked consent).
- Open / Click — engagement metrics for email.
To open it, hover over the Rule's row in the Smart Campaigns list to reveal the ⋮ (three-dot) menu on the right, then click Analyze. The same menu also exposes Move to… and Open in new tab.

Communication Analytics is only available on Rules that send email or SMS. For non-messaging Rules (Add credits, Add points, Send asset, Tag member, and so on), the platform does not currently expose a per-Rule firings count or audit log in the Smart Campaigns UI. The best signals are the downstream effects themselves — credit and point balances on member profiles, tag applications, asset inventories — visible from the member's detail page and the broader Dashboard.
Common patterns
Rather than rebuild a Rule from scratch every time, start from one of the worked examples:
- Credits back + SMS — the canonical cashback + thank-you pattern.
- Birthday gift — a Scheduled campaign that fires a gift on the member's birthday (date-driven, not event-driven; not a Rule).
- Punch card — "buy 10 get 1 free" using the Punch a punch card action.
- Happy Hour — the Deal counterpart, for at-the-till discounts rather than after-the-fact rewards.
Gotchas
4 things that commonly trip people up
- One trigger per Rule. If you need "fire on purchase OR on survey submission", that's two Rules, not one. Stacking triggers isn't possible in the wizard; the one-trigger model is deliberate.
- Audience and timing are tiles, not conditions. A condition saying "branch = Downtown" narrows the trigger's scope; a timing tile saying "only on weekends" restricts the firing window. They're different surfaces and they're not interchangeable — don't put time-of-day logic into a condition or vice versa.
- Anonymous purchases drop silently. The audience tile always filters to registered members (the default is all registered members; narrowing it tightens the set further). Events that aren't tied to a member account — an anonymous purchase, a sale where the cashier didn't scan the loyalty card — don't fire the Rule, even if every other filter would have passed. See the Makes a purchase gotchas for more on this.
- Accumulation Rules need the
memberCreditexclusion. Every cashback (% of spent) and points-accumulation Rule needs to exclude the POS member-credit payment type under Don't accumulate for these payment methods — otherwise balances compound with every transaction. See the Credits back + SMS playbook for the full reasoning.